Tuesday, April 27, 2010

Terrific transfers!

One old picture frame, one naked wall, and a package of rub on transfers, transferred my entry from dull and boring to lively and warm. 
My walls are plaster and bumpy with lots of coats of painted wallpaper.
Here is my blank wall. b o r i n g!

First you level and secure the transfers in place.  You peel off the protective cover and the position the sticky side down.  I used a level and a pencil to mark it straight.  After you have it just right you use a spatula to rub the transfer from the sticky paper to the wall. 
It's that easy!  It took me minutes.
The frame is hung by a nail and the transfers are directly rubbed on the wall.  It's kinda hard to tell how big it really is. The frame is 36 inches long and about 22 inches wide.  I was going to add a red heart painted heart to the bottom right corner but never did. 
I think it needs something.  What do you think?


Wednesday, April 21, 2010

What's Cookin? Kitchen redo part 1.

The heart of the home? Maybe in 1970.
                 This is my "new" home. I hate this kitchen!  It has sunshine yellow walls, dark wood cabinets with white laminate counters. Please don't get me wrong I am thankful everyday  that we are able to live here. I am grateful for all of life's blessings. It is just not my taste.
         
    We just moved here after series of unfortunate events. A major kitchen remodel is not in the budget plus I have lived through one of those it was not fun.
Before


After

 We did finish the kitchen, but moved shortly after which is why I can't find the good pictures.
Anyway this remodel was thousands of dollars. I only have hundreds to spend now. Check back and see what a difference paint, wrapping paper, and new hardware make. Wrapping paper is not a typo!! I will be using it and I am not wrapping gifts.

Sunday, April 18, 2010

April showers, where to put the flowers?

All of this warm wheather has really put me in the mood for flowers and  flip-flops. I am in the process of fixing up my new house. By new I mean, newly purchased fixer- upper. To say the least I do not have the funds to buy the new Urns I wanted  for my front porch. So in the D.I.Y use what you got spirit this is what I came up with.

Please excuse the empty diaper box I was painting  3 terra cotta pots that I found in my garage. I only had one stand so I had to use what I could find.
This is my mixture of Gliden paint color Volcanic Ash and water . I used about two parts water to one part paint because I wanted the terra cotta to show thru. I got the paint at Home Depot, it was one of the small sample size containers. The sample finished three pots and I have a little left over. It was under $3.00 for the paint. I used a foam brush to soak the pots with the paint mixture. I would advise putting them upside down to avoid drips. 
 I bought the white paint pen at Hobby Lobby, and printed the numbers off the computer. I copied the numbers using chalk in case my plan did not work. But thankfully I loved them. I painted over the chalk with the paint pen.
 Aren't they cute grouped together? Over all it was a very easy project that only took a couple of hours including drying time.  The only problem is the wheather is no longer cooperating. Flowers do not like 30 degree wheather and either do my toes.

Chalkboard paint --- Nothing to be afraid of!

The very first time I ever heard of chalkboard paint was when I was skimming blogs a year or two ago.  Sounded too good to be true and I wondered who's idea it was and why in the world couldn't I have come up with it first!?!  *pout*pout*pout*
Dani and I bounce ideas off each other and sometimes when in public it can become a little heated.  Heated in a friendly, I love you, don't cross me sort of way.  We went thrifting and I (note:  sometimes when I say "I" it doesn't mean I.  It sometimes means Dani but me being the hot headed Irish type...it's just easier for everyone... for me to take the credit)  spotted this gold frame:
$7.00 and a little spray paint later....

I was thinking....I could make it into a bulletin board or chalkboard.  I love black and white (hence my kitty, Mr.B and my beloved chair in the earlier post).  I tried chalkboard paint and came up with:

(Note:  My Dad and Mom watch my 7 mo old puppy while I'm at work and I leave them my schedule each week.  I use to jot it down on a scrap paper, paper towel, an old store receipt but not any more)  :)
Try chalkboard paint.  You WILL love it. 
***I used the brand FolkArt Chalkboad paint #2517 Black, it washes off the brush with a little soap and warm water.  So so easy!***  ---Totally not a paid advertisement.  Just an admirer of a great product!---

Saturday, April 17, 2010

Thank you just doesn't feel like enough

-->My cat Mr. B  just fits!

Dani and I started this blog not even a month ago and we are still in the beginning of the learning stage.
I get comments forwarded to my personal email and I can't tell you how excited I get when I see a new comment.  The best way I can think to describe the feeling of opening an email and reading the encouraging, complementary, funny, witty, heartfelt comments is .... FILLING.  My heart overflows and I get a big fat smile on my face and just have to read it again.  Today I showed my Dad the blog for the first time and watched him read it and look at the pictures and smiled as he smiled and he told me how cool it is that I am sharing with the blog community.
So, THANK YOU from the very bottom of my heart for taking time commenting and following and viewing our brand new blog.  I am gitty.  Can you tell?  We promise to post regularly.  We are still learning and figuring out this whole crazy blog thing.  We are lovin every minute of it.
~Jacki

Saturday, April 3, 2010

Isn't she lovely?


Oh, she is!  My obsession started when I went to the Springfield Antique Show and Flea Market.  I was browsing around looking for nothing in particular when I got bit by the oh-my-gosh-I-need-it-I-love-it bug. I found a booth that had absolutely incredible repainted spiffed up amazing furniture. My head was spinning and the only thing I could process...I CAN DO THIS!  So, the very next day I was off to Ohio Thrift to buy a piece of 70's-ish furniture and lucky for my entry...the price was right.  :)
(Did I mention that I never ever tried to refurbish, recover, redo ANY type of furniture ever before?)

 
I took her home and sanded and carefully took out a billion staples, grabbed the can of primer and sprayed sprayed sprayed away.
Waited... not so patiently for the primer to dry so I could spray her black.
Now this is where I got pretty bad at documenting.  I was so busy trying to figure out how in the world to cover up the lovely mustard yellow fabric --gag-- that I didn't take as many photos like I should have. 

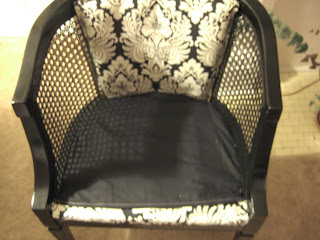
Let me back up. I purchased the fabric for half off at $12.00 a yard at JoAnn Fabric and guestimated that I needed 3ish yards.  When I couldn't figure out how in the world to take the back of the chair apart and disaster wasn't too far away, I decided to grab the hot glue gun.  I glued and glued and burned my finger tips several times but got it just right.  I had some cheap black fabric that I cut to fit under the cushion.
A little crooked but I am still so proud!

The back of the chair was scary but oh so easy!  All I did was centered the material and made a rough cut and tucked and glued my way around.

Before

After
I did have to break out the sewing machine.  Don't freak out!  In 8th grade I was in home economics.  That is my sewing machine experience!  I tucked and folded material around the cushion and marked it with pins and not sure how but it worked out!  The cover was not snug.  I decided to use black buttons to make it more finished, more fitting, tufted.

I glued black fringe around the backing so you couldn't see the glue.

Breaking it down:
Chair $5.95
Material $36.00
Paint and primer free (had it in garage!)
4 buttons free (from an old jacket)
hot glue free (Thank you Dad!)
bandaides for the blisters on my fingers free - had on hand.

Whatcha' think?


Tuesday, March 30, 2010

You Had Me At Hello

The entry in my new home. By new I mean 70's two story that screamed cottage when I entered. I loved the brick tile floor. Not the color, but the possibilities of what it can become. My living room has amazing beams on the cieling (future post). I am on a strict budget and I must use what I have to decorate. I am still unsure if this light has found its permanant home.So let's price my space... from left to right

1. Candle hurricane -Goodwill $4.00  this is not a set I put a plant stand base and the glass piece together
2. Plate with stand- Home Goods $3.99 each, I made the tassel                                                              
3. Blue bird- Home Goods $2.99                                                                   
4.Hurricane Southern Living - free hostess gift glass $2 at the dollar store
5.Table -free I spray painted it black it was Hunter Green very 80's I retrieved it from mom's house
6. Wall decals-$5.99 Home Goods
7. Lantern $39.99 Home Depot

I spent $62.95 to redo my entry. It is not perfect, but much more inviting. Decorating does not have to be expensive to be beautiful. Use what you have and enjoy!