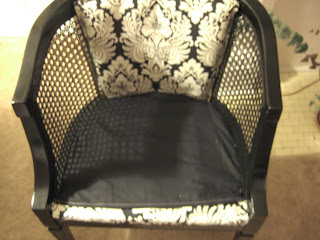
Oh, she is! My obsession started when I went to the Springfield Antique Show and Flea Market. I was browsing around looking for nothing in particular when I got bit by the oh-my-gosh-I-need-it-I-love-it bug. I found a booth that had absolutely incredible repainted spiffed up amazing furniture. My head was spinning and the only thing I could process...I CAN DO THIS! So, the very next day I was off to Ohio Thrift to buy a piece of 70's-ish furniture and lucky for my entry...the price was right. :)
(Did I mention that I never ever tried to refurbish, recover, redo ANY type of furniture ever before?)
I took her home and sanded and carefully took out a billion staples, grabbed the can of primer and sprayed sprayed sprayed away.
Waited... not so patiently for the primer to dry so I could spray her black.
Now this is where I got pretty bad at documenting. I was so busy trying to figure out how in the world to cover up the lovely mustard yellow fabric --gag-- that I didn't take as many photos like I should have.
Let me back up. I purchased the fabric for half off at $12.00 a yard at JoAnn Fabric and guestimated that I needed 3ish yards. When I couldn't figure out how in the world to take the back of the chair apart and disaster wasn't too far away, I decided to grab the hot glue gun. I glued and glued and burned my finger tips several times but got it just right. I had some cheap black fabric that I cut to fit under the cushion.

A little crooked but I am still so proud!
The back of the chair was scary but oh so easy! All I did was centered the material and made a rough cut and tucked and glued my way around.
I did have to break out the sewing machine. Don't freak out! In 8th grade I was in home economics. That is my sewing machine experience! I tucked and folded material around the cushion and marked it with pins and not sure how but it worked out! The cover was not snug. I decided to use black buttons to make it more finished, more fitting, tufted.
I glued black fringe around the backing so you couldn't see the glue.
Breaking it down:
Chair $5.95
Material $36.00
Paint and primer free (had it in garage!)
4 buttons free (from an old jacket)
hot glue free (Thank you Dad!)
bandaides for the blisters on my fingers free - had on hand.
Whatcha' think?


WOW! Great material!!!! LOVE IT
ReplyDeleteI love the black and white with fringe. How creative.
ReplyDeleteYES' ever so LOVELY... great job! I LOVE IT! JGG
ReplyDeleteThat is fantastic!! I have no vision. I'd see that chair at a yard sale or somewhere and totally disregard it. I love, love what you did with it!
ReplyDeleteThis is so right up my alley...I'm a glue gun girl at heart and have the burns to prove it! Your chair is a knockout! I'm in awe! Very inspiring! Is the fabric staying in place ok with having been glued? Truly, I now want to get out to some yard sales, grab some junky chairs that you think would be great firewood and instead of burning them, refinish into something fantastic like this!
ReplyDeleteI'm your newest follower too! Come visit me sometime. Have a good day!
ReplyDeleteHello there... just found your blog and I am so impressed already... you did a gorgeous job on that chair... I love the little ruffle, good thinking. Welcome to blogland... it will all fall into place don't worry... can't wait to see what you are up to next.
ReplyDeleteHugs, Deb